This is an example (or a tutorial or whatever) which shows some "advanced" usage of rvglue.
Everything mentioned in it is included with the rvglue distribution:
| directory | contains |
|---|---|
| toy2-glue5-example\toy2\ | The full resulting track as replacement for "Toy World 2", including the command file, and all required data to rebuild the scratch. |
| toy2-glue5-example\tdf\ | The two lego tracks the result is based on as .tdf files. You can copy them into your re-volt\editor\tdf\ directory to edit them with the lego editor. |
To install the example, do the following:
From now I'll assume you've seen the track, and know how it looks like. Now let's discuss how the track was created:
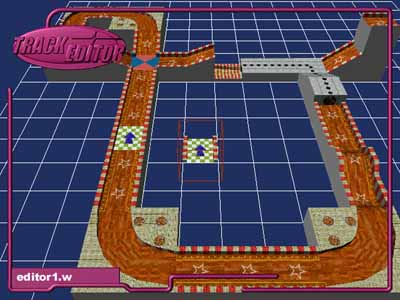
The track has one "major" body, which has been made with the lego editor. It is called "editor1", and looks like this:
From this track we'll use everything - most data in the toy2 folder is what the lego exporter created. The resulting track body has been renamed to "editor1.w", and I'll reference this track as "editor1" from now on. Notice that I exported the track double-sized; when you re-export it single-sized, most things will no longer work unless you modify all other things, too.
The walls and floor of this track will get textured by simply using the options wall_double and texturefloor. Look at the command file to see how it's done.
The next thing is that I applied some options to small parts of the track. This has been done with the tazsplit option. We need to set up a special track zone file to specify those "small parts". The file is called "forfirst.taz".
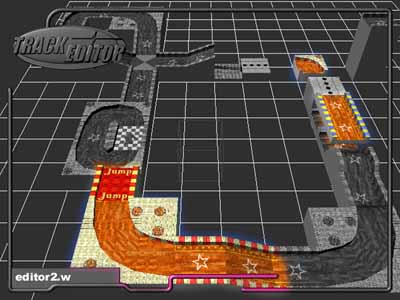
There are some "additional" parts in the track which haven't been made yet. I used the editor1 track, modified it a bit and exported it as "editor2". This time the racing line is a small loop, and the rest isn't driveable at all. I was only interested in a few parts of the track, which are shown colored here:
For this part I created another track zone file (forsecond.taz). It contains lots of track zones with ID 0 and 1 that mark the parts I want to keep. The rest of the track gets cut out. (This is done by using the "default" group of tazsplit, which affects everything outside the zones, using an empty option group to exclude zone 0 from the "default" group, and an appropriate zone-1-group to make that part double-sided.)
Finally the command file (included as "command.txt") looks like this:
|
# create the body for track "toy2": create toy2 # include the lego track "editor1.w". It defines # most of the resulting track editor1.w (
# We add a second lego track body. This time, most of the track # is useless, we are only interested in some special parts of it editor2.w (
|
And that's all. Run rvglue with that command file, and the track is ready.
 Let's just assume that we are lazy to make a Track Zone for all invisible barriers (Zone 4).
To get rid of the invisible barriers quickly, we can also use lower_coll. The command file which
does this (included as 'command1.txt') looks like this:
Let's just assume that we are lazy to make a Track Zone for all invisible barriers (Zone 4).
To get rid of the invisible barriers quickly, we can also use lower_coll. The command file which
does this (included as 'command1.txt') looks like this:
|
# create the body for track "toy2": create toy2 # include the lego track "editor1.w". It defines # most of the resulting track editor1.w (
# We add a second lego track body. This time, most of the track # is useless, we are only interested in some special parts of it editor2.w (
|
As far as the racing is concerned, you get the same result with 'command1.txt' as with 'command.txt'.