
Version 0.7 Last Modified 29th July 2002
![]()
Setting up the Material Editor
The material editors used in 3D Studio Max R2.5 and R3.X are very similar, the differences that do exist should not affect this tutorial. To begin, Reset the Scene and open the Material Editor and you should bring up something like the image below. Setting up the Material Editor is tricky at first, once you've done it a few times it'll be easy.
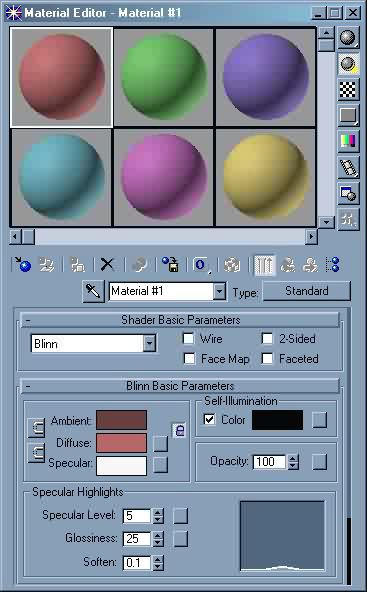
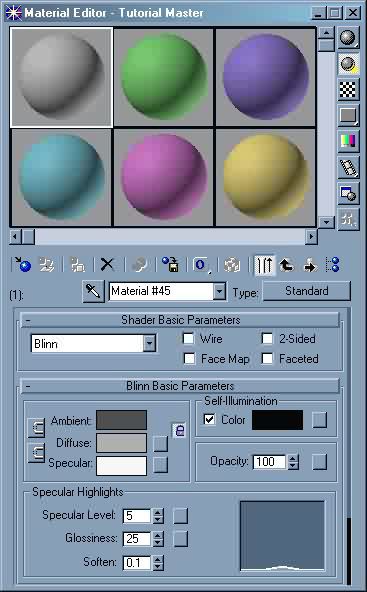
This is the screen that will open by default when the Material editor is started. At the moment the material type is "Standard", change this to Multi/SubObject by:-
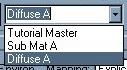
(1) Clicking the "Standard" button.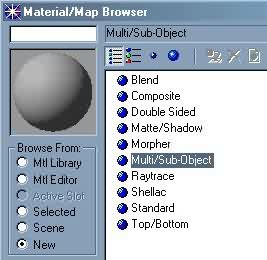
The Material Editor will change to incorporate the image (cropped) below.
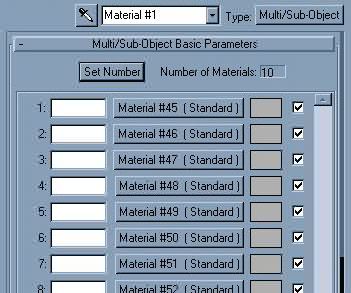
(4) You can help yourself to understand the organization of this new screen by imagining each of the Sub-Materials (#45 to #54 in this example) as if they were folders, presently they contain no information. To confirm this Click the "Material/Map Navigator" button.
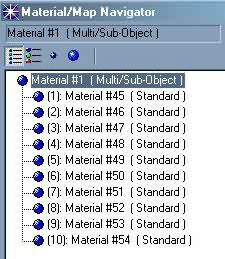
When you open the Material/Map Navigator a window similar to that above will appear. This shows the structure of the Master Material, the numbers in brackets are the Sub-Material ID numbers (forget about them for the moment), then you have the Material Name and type. As you add bitmaps to each Sub-Material you can check your progress by keeping the navigation window open.
For now drag this window to one side and return to your Material Editor Window.
(Note For TechHeads: You can also use the navigator to open up the particular material you want edit, or for checking that you enabled each sub-material in the viewport)
To rename the Master Material, highlight its name (currently Material#1) and type in something more appropriate (Your car or tracks name would be good)
![]()
![]()
(6) Next Click on the first Sub-Material in the list (in this case its #45). Yours probably says its number #25 this don't matter at all just think of it as the first in the list.
After your click the Material Editor will change to the editing screen for Sub-Material #45 (or whatever #number you have that was first in your list)
While your here notice the Specular Color is White, and the Opacity is 100, these effect the Glossiness and Transparency of the material. Don't worry about this too much at this time.
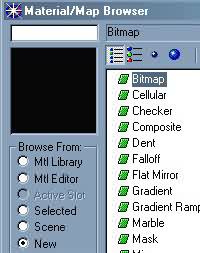
(8) Next load in your diffuse bmp[the images show how this is done in R3] its a familiar task if you've ever used the Acclaim Plug in with R2.5 but the route is slightly different in R3.x.
The ASE Tools use the last letter of the bitmaps filename to establish mapping to your intended bitmap, this feature allows you to load your anythinga.bmp into any of the submaterial slots (#45 to #54) without confusing the tools (You may decide to load you a.bmp into #48 but this is more likely to confuse you, the tools couldn't care less where you put your bitmaps, or how many a's you use, multiple "a" bitmaps are very useful when setting up transparencies and specular color for the -ali switch and specular color for the -morph switch.
The important thing is that the tools won't complain providing your bitmaps are named anythinga.bmp, anythingb.bmp, anythingc.bmp etc. On the reverse side, the tools will complain if your bitmaps are named "floors.bmp", "signs.bmp", "morph_is_nutty.bmp" for the single reason that in each of these cases the last letter (s,s and y) are outside the permitted range which is A through J, "These_docs_are_driving_me_mad.bmp" is quite acceptable because the last letter is "d".
Note for Techheads: Material#45 (the first in the list) now called "Sub Mat A", will hereafter be referred to as having a Material ID equal to 1. It is the fact that it is first in the Sub-material list that gives it this ID, the second Sub-Material #46 is second in the list and would get an ID of 2 and so on and so fourth. It is not linked with the #45 part which is irrelevant. Material ID's will become important later when you begin mapping the different materials to different polygons.
For now, just load the bitmap.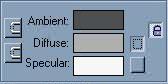
This will take you to the Diffuse Map Editing Screen (Shown Below).
Note: I always Disable the "Show Result" toggle, and make sure that the "Enable in Viewport" toggle is switched on. (If your watching the Navigation window when you enable the map in the viewport, you'll notice that the green flash to the left of the Map entry turns red, this is cool as toggling this latter switch is easily forgotten and will effect whether you can see your bitmap in the viewport)

(9) Rename the Map to something appropriate (you may not consider "Diffuse A" to be very appropriate, I've chosen this to indicate that this properties screen is for the diffuse "channal" of Sub-material A, there are various channels within a sub material that can be filled, but the Diffuse one is the one you should use for Re-volt, if you load a bitmap into the specular channel it will not be exported to Re-volt). Choose a name you feel is appropriate, if your sub-material was called 'Floors', you may decide to call the Diffuse channel 'Floors' as well or 'Floors Bitmap' or whathever you like, this isnt the army you know.

And return to the Master Material Screen, one route is by pressing the drop down arrow next to the map name and selecting "Tutorial Master" (or equivalent)
(10) Repeat the whole process for the second Sub-Material in the list but add you anything_b.bmp to the diffuse channel.
Note for Techheads: You may have already worked out that you could put anything_a in again if you wanted and change its opacity and/or its specular color.
Note for Car Makers: Unless you want to use Transparency with the -ali switch (if you can, I haven't tested transparency on cars yet), you should stop here. Cars should only use one bitmap although the letter doesn't appear to matter, its wisest to use the letter a as the last letter in your bitmap.
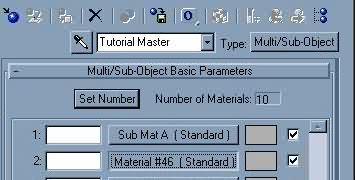
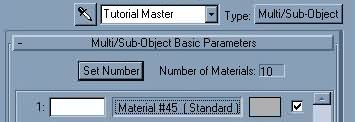
(11) Carry on repeating these steps until you have entered all the details for all the bitmaps you wish to use. (If you intend to use less than the full compliment of 10, reduce the number of Sub-Materials available using the "Set Number" Button, only use as many Sub-Materials as you intend to fill, doing otherwise may confuse the ASE export function of MAX, if you want to add more Submaterials for transparencies and specular colours, increase the number instead.
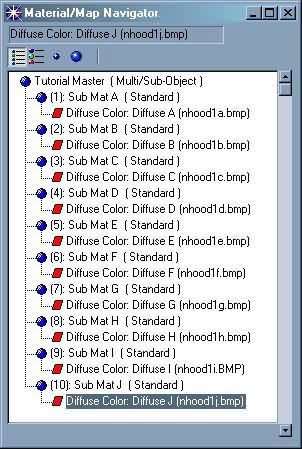
You should end up with something like this in your Navigator.
Its a good idea to save your Master Material when its finished. Click the "Add to Library" button in the Material Editor window, choose a name, and this will save it so that you can call it back up from anywhere should you need to. If you save your scene as a .max file, the material will be conserved as part of that file, but will not become part of your library which is separate.
![]()